Pages

Friday, February 15, 2013

EGGPLANT


This blog will be updated with each change in the Eggplants we are growing (sprouting through their first transplanting).  I will add any information which is helpful in raising Eggplants Organically as it becomes available.
I am growing four varieties of eggplants this year.  Hopefully this will be the year I convince my hunny eggplant is delicious,
 not just beautiful.

LEFT:   Eggplant flower

UPDATES:
Feb 16,  Feb 21, Feb 22, Feb 24, Feb 26, 
Feb 27 
The eggplants we'll be growing this year:
MELANZANA ROTONDA BIANCA SFUMATA DI ROSA:
La Semiorto Sementi (New England Seed) Produced and packed in Italy.  2007. This is the only eggplant seed I proofed because of it's age.  Put to proof 20 seeds February 3, 2013, Two sprouted February 14, today 02/15 one more sprouted.   I am planting 40 seeds.  I hope I get at least 4 plants.  This is a fantastically flavored eggplant with very few seeds. (There were several 100 seeds in package pd $3.49)

ROSA BIANCA:   Gurney's Seeds 2013  I think this is probably the same eggplant as the above.  I ordered it because at the time I placed my order I had not proofed my seeds.  The package says seed was grown in the USA.     Planting 6 seeds, I want 4 plants. (package said 30 seeds and that is what I received, pd $2.99).

ASWAD:  Baker Creek Seeds, 2012.  Never planted this variety.   Last years seed, planting  12 seeds I would like to have 6 plants (Package said 25 seeds, I received 70+ seeds  pd $3.00)

DIAMOND:  Baker Creek Seeds, 2012.  Never planted this variety.  Last years seed, planting 12 seeds would like 6 plants. The package states this is a mild dark purple 6"-9" x 2"-3" slender fruit of superb flavor and firm flesh.  (package stated 25 seeds, I received 69 seeds, pd $2.00) 


EGGPLANT FLOWER WITH A FRIENDLY VISITOR

PLANTED
FEB 15          DATE       DATE       DATE        DATE       DATE       DATE        DATE       DATE
                     FEB 21     Feb 22        Feb 24       Feb 26        Feb 27       Mar 2 
DI ROSA                                            7/40          17/40         19/40        21/40

BIANCA                                                               0/6            0/6      

ASWAD         7/12       8/12               8/12           9/12          9/12           9/12


DIAMOND    4/12                             5/12           4/12          9/12           10/12

February 21, 2013:  I didn't check the seeds last night (they had been checked at 6 AM on the 20th).  This morning they were already an inch high and very lacking in chlorophyll.  They have been put under a light source to start manufacturing it.  I am using a goose neck lamp with a 60 watt bulb right now.  It's too early to run down and stick them under the grow lights in the barn. 

Six days and they sprouted.  The seed is 2 years old and eggplants.  I didn't expect anything for at least 10 days.  The temp in the propagation box was a steady 80 degrees for the last 4 days.  The first two days it was 75 degrees.  I couldn't get the temps any higher, I switched to a smaller Styrofoam containers so there would be less room for the yogurt maker to heat.  The heat from the bulb, not just the light, will be beneficial in their growth.  Egg plants do not like to be cold.  It stunts their growth. 

When I put them under the grow lights I will put a regular people heating pad under them on low so they will have heat coming up from below.  The room is only about 65 degrees.  They will not be set directly on the mat they will be on a cookie cooling rack that I filched from the kitchen.  Sitting on the mat the heat would be concentrated and too warm even if it were set on the lowest setting.  Yes, heat mats for plants are available but I have a heating pad.  I just have to be more attentive, monitoring how hot this one gets because it doesn't have a thermostat to turn it off or down.

Stress of cold, uneven watering, even transplanting can cause eggplant to be stunted resulting in decreased production.  You want the plant to be growing quickly, keeping a nice green stalk.

February 22, 2013:  Slow but sure.  I sure hope the other two sprout soon.   Just in case you are not reading the blog about broccoli:   http://organicinstlouis.blogspot.com/2013/02/broccoli.html 
I will post about a change in procedure I am using.  Yesterday  I discovered a better way than using the plastic wrap for wrapping the trays.   There is a zip lock bag which has a glide closure and the bottom of the bag is a box flap.  The zipper allow easy access to the bag, and the box bottom allows for three of my plastic trays to fit in a gallon size.

The chlorosis cleared up after 10 hours under the lights and they didn't get any leggier.

February 24,  2013:  Being I was planting so few seeds I decided to divide the containers and plant two varieties in one tray.  I had not taken into account that different varieties germinate at different times.  Then you add into the equation the age of the seed and you have a totally different circumstances.  I placed the Bianca in with the DI Rosa.  The older seed has surprised me and sprouted first.  My new seed from Gurney's has not sprouted at all.  I thought the new seed would have sprouted before the other one. I did not proof the new seed but I did proof the DI Rosa because it was from 2007.  See above seed description at top of blog.   These planted in the soil less mix have started sprouting in 9 days.  I am so pleased with the results and the longevity of this seed. 

The problem I have now is the Gurney seed has not sprouted.  The tray has to be out so the other  side can get light.  I am having to keep the surface more moist so they have the best possible chance to germinate.  They also are only about 72 degrees not the 80 in the propagation chamber.

If we don't have any catastrophes I have enough of the Aswad and the Diamond sprouted.  If any more sprout they will be more than welcomed, but if they don't we will be fine.  Especially if I can't get Hunny to consume them.

February 26:  The Gurney seed still hasn't sprouted.  It has been eleven days.  Some sources say up to 21 days for germination.  But you can see the other varieties have sprouted. I have plenty of plants of the other varieties but wanted to try the Bianca to see if it was the same as the Di Rosa.   I've had an admirable showing from the New England seeds which are already 6 years old.  We are almost to 50% germination.  (the proofing showed just under 50%)  I will be saving this seed and proofing it again next year.  Proofing will tell me the viability of the seed and how many I have to plant to get the number of seedlings I need.

If you do not know about proofing seed I blogged about it here:
http://organicinstlouis.blogspot.com/2013/02/proofing-seeds.html

In your reading about Eggplant culture I don't know if you have learned about the importance to keeping eggplant plants warm during their growing out.  In fact through their whole life.  We baby our seedlings to the point where we make a small "green houses" inside our green house and put a heat source on the bottom so the roots stay warm.  This is like a playpen for the plants.  (A playpen would be fabulous to use if you could find one at a garage sale..all you would have to do is put a heat pad in the bottom and make a rack above it to sit the plants on and then throw a sheet of plastic over it to keep the heat in.)  We just use a wooden pallet to sit the plants above the heat source and make sides from what ever resource we have and cover it with plastic. 

February 27:  When I watered the seedlings last night I notice I have some new sprouts.  I was thrilled the oldest seed was nearing 50% germination.  (the only problem with this is I will have to find homes for the ones I can't use).   The other two seeds, which were from last year,  are at 75% germination.  I am very disappointed that the new seed from Gurneys is not germinating and it has been given an ideal environment.  I just called Gurney's and they were extremely nice.  I explained my predicament and they took care of the situation.

MARCH 2:  Today is moving day.  Will be writing a separate blog for the seedlings.  Only the Rosa Bianca did not grow I am pleased with the other seeds.  This is the new blog about the repotting:
http://organicinstlouis.blogspot.com/2013/03/eggplant-transplanting.html

 Baker Creek packages stated the following: to sew seeds indoors 8-12 weeks before last frost. Most species are from Africa or India. They can be surface sewn. ( I have always planted them 1/4 inch deep.)  The seeds could take up to 3 weeks to germinate. Other sources say Germination is 7-14 days.  In my propagation chamber it is usually is closer to 7 days for eggplant.
 ABOVE: PURPLE RAIN EGGPLANT 
This eggplant was very prolific.  The eggplants were small usually around 4 inches long or less.  flavor very mild. I found the skins very tough.

The eggplants here were  grown in our green house in 2007.  It was a very successfully endeavor..

MY ESSENTIAL TOOLS FOR SEED STARTING

Clockwise from 12 o'clock:   Roll of plastic wrap; wax paper sheets; scissors; glue stick, plastic container; notebook, glasses, pen, chop stick;  bag of moistened seeding mix; paper towels select-a-size

Center:  ultra fine point sharpie, tweezers, (the wax paper cut into sheets and folded into pockets)

I can't stress enough how important it is you make a paper chart while you are working.  Record pertinent info and maybe even info you don't consider relevant. 

When I open a packet of seeds I count them.  Then I put them in a wax paper pocket on which I have written on the outside with the ultra fine point sharpie the package info (the variety, the company, the year, and the number of seeds left after I use them.)  Then I put the little packet inside the package which they originally were in.  This keeps seeds from falling out of the package. 

We use all sorts of plastic inserts for planting, even the covered take out containers (the ones with clear lids).  The only prerequisite is they be deep enough to allow space when the seeds sprout. You don't need much room above the dirt, maybe 1/2 inch to an inch. 

February 27:  While planting my peppers I found the ideal container for starting a few seeds in.  My "activia " containers with their edge cut off.  5 seeds fit comfortably in them. 

Before you fill your container make sure you make a label and attach it to the container. At the same time record all information ( I.E. planting date, variety, seed company, seed age, how many seeds planted)

Press the wet soil less medium into the bottom of the plastic containers.  Then use the tweezers to pick up and lay the seeds on top of the medium.  After your seeds are in place go back with your chop stick, which has been marked with the proper planting depth,  and poke the seeds into the medium.
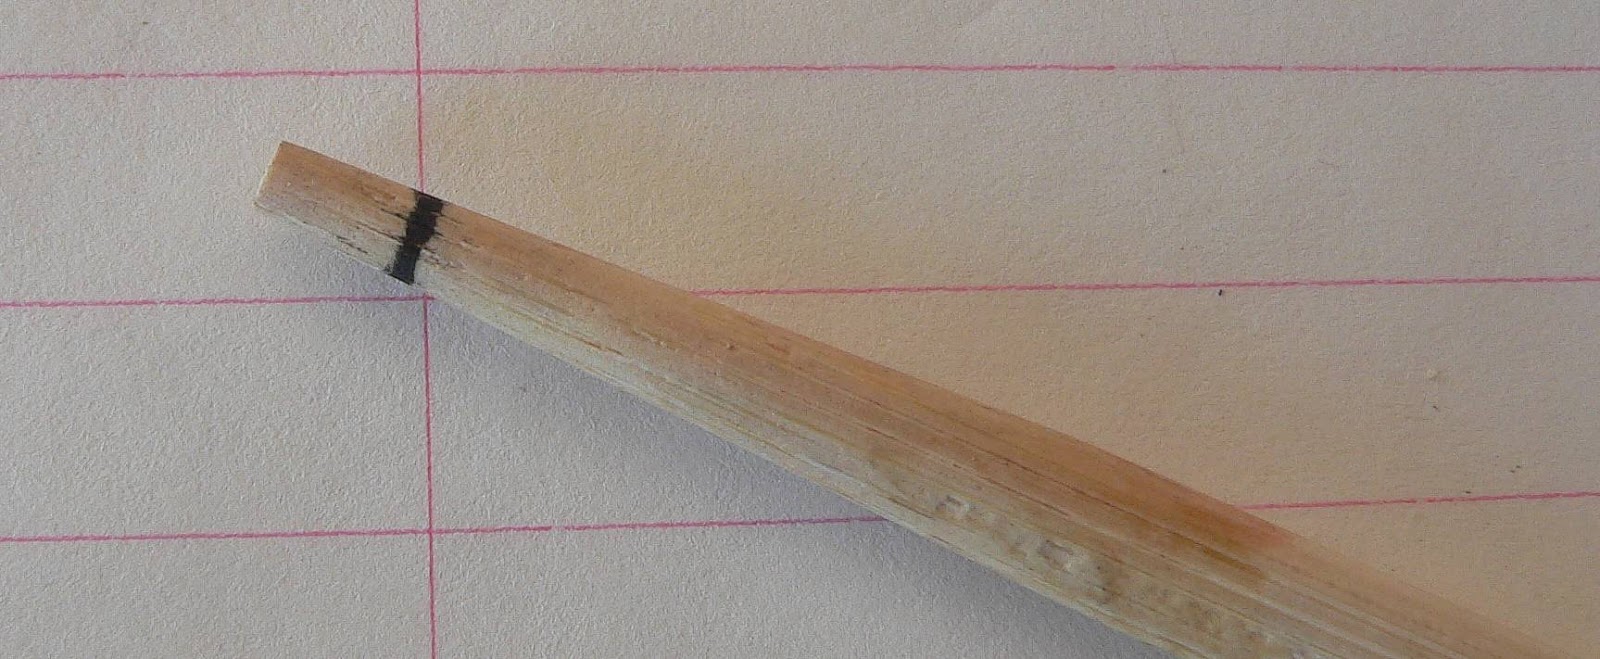
CHOPSTICK MARKED WITH 1/4 MEASUREMENT

February 27:  While reading through this blog after I wrote the seedling additions I realized I had never explained the importance to starting your seeds in a soil less mix.  There are many bacterias and fungus present in regular soil.  The germination temps are high for eggplant and this encourages the growth of these critters as well as your eggplants.  They love to establish homes on little plants.  You could use regular soil but are taking a chance on raising the plants to maturity.  Another draw back to soil is it packs and the seeds have to fight their way to the surface.  It is also difficult to keep consistent moisture  on the surface.


After the seeds are pressed into the medium I use the other end of the chopstick and lightly tamp the soil less mix over the seeds.  Next I cover the container with plastic wrap and put it in our propagation chamber.  In the following blog I explain how we made our propagation chamber.  Scroll down about half way on the blog.

February 27:  Another thing I have found that is a big help is the use of those zippered bags with the box bottoms.  They accommodate my containers well, and it is easy to open the bag to check for germination.


Our Propagation Chamber ( a 28" x 18" x 16" Styrofoam cooler) has two yogurt makers in it.  I only have one on and the temperature is staying right at 80 degrees F with the lid closed.

Eggplants we have grown in the past:


ROSITA:  fruits are about 1 - 1 1/2 cup size.  the flesh is pure white.  They are usually a little pinker than this.  The flea Beatles seemed to enjoy them more than the other varieties.  They were not as prolific as other eggplants we have grown.  We will give them a second chance because they were so delicious.
BRIDE:  for us these were a very lackadaisical in taste eggplant.  The flesh was firm with hardly any seeds.  They were prolific.  The largest eggplant was maybe 6 inches long and 2 inches wide.
KAMO: wow what an eggplant.  The only problem with it is it isn't large enough.  it has extremely firm flesh with a slight green coloring.  very very mild.  Seemed less susceptible to the flea beetles.  It grows on extremely large 3+ feet plants.
PING TUNG:  The flavor of this eggplant was okay.  The plants were scrawny, not very leafy.  It wasn't very prolific.  when cooked the flesh went to mush immediately, and the skins were tough.  They were a couple inches long to 7 inches long and were only an inch through.  We won't be planting these again.


For more blogs by me, visit at:

A blog mostly about quilting,
but cooking, poetry, prose and a little gardening,
New blog, tutorial on how to make 5 panel Boxer Shorts.
New Blog about dolls.
Not a garden blog. 
There are articles which have nothing to do
with creating or gardening.
There are blogs on the new born baby kittens
we found and mothered.
It is a blog where I voice my opinions which will always be environmentally friendly.

As always, any pictures or writings are my own.
Credit has been given to contributions not my own.
Please do not use without permission.


Tuesday, February 12, 2013

PROOFING SEEDS

Edited February 14, 2013
Edited February 18, 2013
Edited February 24, 2013
Proofing Seeds saves money and time.  I was late starting the gardening for this year and ordering seeds.  I went ahead and ordered new seeds of varieties I had in the larder. I didn't want to be without.  I now wish I had proofed my seeds.  For example, after proofing my seeds last week I discovered I had viable sugar snap peas in enough quantities to suit my gardening needs for this year.  I had just receive a seed order where I had spent $8.99 for my snap peas.  I did not have to spend that money.  Needless to say these will be set aside for next year's garden.
Another advantage to proofing seeds is you won't waste time planting seeds which won't grow.  On seeds with a low germination rate you know how many to sow to make sure you have good germination.  You won't be disappointed a week later with nothing coming up.
If you are wondering how to proof seeds it is very simple.  If you keep your house at 72 degrees the heat requirement is satisfied (if your house is very cool you will want to have them on top of a water heater or other nice warm area). 
You'll need:
a roll of select the size paper towels
Sharpie fine point not ultra fine,
plastic bags (not the kind with the zippers, just a plain fold over top sandwich bag).
a  plate with sloped edges
old detergent bottle with the nozzle cap (a cream pitcher works too)
 
The object is to have the seeds in a moist, dark, warm environment.
I usually proof 10 seeds in each packet  (unless there is a limited amount of seeds).  The reason for ten is you can get a percentage when they sprout, I.E. if you have 10 seeds in the packet and 8 of them sprout you have 80% viability.  If you only have 2 sprout you only have 20%, which is pretty poor. 

Take a plastic bag for each seed packet you are going to proof.  Use your sharpie to write on the outside of the bag the information on the seed packet.  I.E. the name of the variety of seed, and the year it was produced for.
This is the time I want to say, when your seed order arrives, make sure the date on the back of the packets say, produced or packed for the current year.  I have a friend who received seed this year from a respected company that had a sticker saying it was packed for 2012..and on the bottom of the package in the fine print was that it was packed for 2010.  I have purchased old seed before but knew it was old seed and the company took the responsibility to proof the seeds before it left their building so I knew my percentage of viability.  The only reason we even noticed was because I was showing her about proofing seeds and told her, on new seed she didn't have to do it. I also explained there were charts available on line which told how long seeds of different varieties were viable. So we were reading the backs of packets and voila, the new that was old seed, reared its head.
How to proof your seed:
On a plate place a select -a-size towel.
Dampen with water.  Not sopping wet but very wet not just damp.
The seeds will absorb some of the water.

Place your seeds on the towel.  Then fold it into a little packet.
 
Pick the packet up and put it in the labeled plastic bag.
(Give a squeeze  before you do to make sure you don't have water running out of the towel. 
If you do, squeeze out the excess.  You only want the packet nicely wet...not sopping.)

I store my packages in a plastic box in a warm place.  You can see the seeds already in my storage box.  Any take out container works.
The box is then stuck in a brown paper bag to exclude the light.

You also need a pen and paper for compiling list of the seeds you are proofing.

The seed company listed as Mine OP stands for seed I saved and it was open pollinated.
This is how I made my list from this year and my results:

COMPANY              YEAR         VARIETY                DATE      DATE     DATE   DATE DATE
                                                                                         2-03          2-07         2-09     2-14    2-16
 
RISPENS SEED          10       SPARTAN ARROW                       10/10      10/10
                                                    BUSH BEANS
 
SHUMWAY                 07       EXPERIMENTAL                           4/10        8/10        
                                                    BUSH PEA
 
PINETREE                   10       SNAP PEA                                       9/10      9/10         
                                                 SUPER SUGAR SNAP

NEW ENGLAND SD O8   MELANZANA ROMANESCO          0/20      0/20        2/20     5/20  
(this seed is from Italy and the fruit was fantastic.  Even with horrible germination I will plant it)
February 18:  This is a note not to give up on old seed.  Today there are 4 more seeds sprouting in this variety.  I give seeds at least a week past when they should have sprouted, unless the seeds have obiously rotted.  Eggplants which are fresh seed have a sprouting window of 7-21 days.   This seed was planted February 03.  Today is well with in the 21 days.
               
SHUMWAY  A            08      LIMA SPECKLED                                 0/10       0/10
                                                 CHRISTMAS
 
 
"     "            " B             "         "            "        "                                         "             "
 
GURNEYS                   07       DWARF GRAY SUGAR                     10/10     10/10
 
SHUMWAY                 07       SUPER SUGAR SNAP                         6/10       7/10
 
SHUMWAY                 08       MAMMOTH MELTING SUGAR        2/10       2/10
 
SHUMWAY    UNKNOWN   TENDERGREEN BUSH                      2/10       2/10
                                                   EXPERIMENTAL
 
PINETREE                   10        JADE GREEN BUSH BEAN               7/10      7/10
   
SCHEEPERS               07        QUADRATO D'ASTI ROSSA             0/05        0/5       0/5
                                                          SWEET PEPPER                               Februar 24 2/5
 
MINE OP   harvested 12(Fall)   SPARTAN ARROW                         10/10      10/10
                                                    PERFECT SEED
 
MINE OP     ""     ""         ""     SPARTAN ARROW                             9/10       9/10
                                                  IMPERFECT SEED

MINE OP    """             11        COMPOST GOLD TOMATO  WET    0/10       8/10    8/10
                                                                                                                     February 24   9/10
 
MINE OP    """             11          COMPOST GOLD TOMATO  DRY  0/10       0/10    2/10
The above two tomatoes were from a plant which grew in the compost pile.  We had never planted a small yellow cocktail tomato.  It was extremely sweet, did not crack when it rained, very prolific not an extremely large plant like indeterminate cocktail plants usually are.  The plant set fruit after the nights went below 50 degrees.    The leaves never succumbed to the diseases that were prevalent that year.  The tomato labeled wet was the one we fermented the seed.  The label dry, was fruit retrieved off the plant that had dried on the plant.
 
MINE OP   ""    ""    "" 12        ACONCQUA PEPPER                         0/10       7/10
                                                  HARVESTED FROM GREEN HOUSE
 
We planted some of these pepper plants in the green house because the ground hogs were destroying our garden.  Due to the extreme heat they did not bear till after august. We were unsure if the seed would be save-able.  (The original seed was purchased from Pinetree Seeds.)
 
The results of this test don't just show me the viability of the seed.  They show me how fast they sprout.  Which is nice to know, especially on tomato and pepper seeds.  I am so anxious for everything to sprout so it keeps the stress out of the gardening.

February 18,  BTW the container you store your little plastic parcels in will have a strange fementing/yeasty smell when you open it.  Nothing is wrong it's natural.

February 24:  I was getting ready to throw away the contents of the box and decided to look and see if there had been any changes in the packages.  Much to my delight is the Scheepers pepper seed had sprouted.  2/5 This is a good enough percentage to plant it.  the test shows me I will just have to be patient for it to sprout.  ( I haven't checked the seeds for 4 days) It seems they took between 15-20 days to sprout.
 
What have I done with my seed because of the results of this test?  I have thrown away the speckled limas, the mammoth melting sugar, and the tender green experimental.  I have also thrown away the "compost gold dry". 
 
I was surprised the  07 Gurney's dwarf gray sugar had a 100% germination.  I know planting them in the ground probably won't give the 100% but it was nice to know I will have a high response when they go in the ground (if the ground isn't too cold and wet!)  I think we will put some in the green house this week and see what happens.  WE have done it before:
This blog shows the last time we planted them.
 
Good luck, have fun with your garden.  Read and google everything you can.  Glean what you think will work for you from the knowledge you harvest.  Remember what works for someone else may not work for you.  If it doesn't, work with what you have and try something new. 
Gardens thrive on attention, a good food and water.
 
 
For more blogs by me, visit at:
A blog mostly about quilting, but cooking, poetry, prose and a little gardening,
New blog, tutorial on how to make 5 panel Boxer Shorts.
New Blog about dolls.


Not a garden blog. There are articles which have nothing to do with creating or gardening.
There are blogs on the new born baby kittens we found and mothered.
It is a blog where I voice my opinions which will always be environmentally friendly.
As always, any pictures or writings are my own.
Credit has been given to contributions not my own.
Please do not use without permission.

Friday, January 18, 2013

BROCCOLI SOUP


It is almost the end of January.  I am going to be optimistic and think that I am going to be planting my broccoli and cabbage plants soon.  We have a green house/cold frame. Last year we planted early and would have been able to reap the rewards except we had a ground hog decide we planted the smorgasbord just for him.  In one night (he or they) destroyed 36 heads of broccoli ready to harvest.  Twenty-eight heads of cabbage were also made inedible.  

This was a very hard to take disaster   Needless to say I stopped planting anything until the critters had been relocated.  Through the summer we relocated 10.  I'm hoping  that was all of them.  Right now we are re-fencing,  Our resident deer have done a number on the fences.  We have seen a group of 9 deer since hunting  season was over.  They are not bothered by us, they look up from grazing, staring at us chewing, their mouth's full.  No one told them it's not manners to come to the party uninvited.

Cold is not a deterrent to thinking about the garden.   An off-shoot of gardening is a love of cooking.  I am always looking for creative way to serve the produce from the garden.  We are soup lovers, it is a convenient medium to use lots of kinds of vegetables.  

One of the things I am doing this year is to make my cooking more heart friendly.  I have created a recipe that satisfies my cravings for creamy decadent soups.  The following is last night's soup. 

A DIET WORTHY VERSION OF
CREAM OF BROCCOLI SOUP

First you have to get over the notion cream soups have to be made with cream.  It is the consistency our brains are craving not the calories.  This consistency can be achieved through using potatoes.  

The next dieters aid is flavor.  We have an arsenal of flavor enhancers at our disposal.  There are herbs, fresh and dried (fresh gives a larger flavor boost). There is salt for those who do not have a salt restriction (any salt though adds to water retention in the body).  You have broths you can make or buy.

You eat with your eyes so you want color in your concoctions.  According to the soup I am making I add vegetables of that color.  Carrots are a great color enhancer (they won't add a lot of flavor to things like a squash soup or a garlic soup..but they will enhance the color and as a root vegetable they add another spectrum of vitamins and minerals).  A favorite in my freezer for color enhancing is frozen peas.  They add delightful color to cucumber soup.  I have never made a soup, other than Borscht, with beets but I can imagine the neat color it might add to maybe a potato soup to serve at Valentines Day or Christmas.  I am sure you can think of several natural color additives.  (Don't forget to add onion peelings to clear broths for a golden color)

INGREDIENTS/DIRECTIONS FOR CREAM OF BROCCOLI SOUP

BROTH OR WATER 4 CUPS (I recommend chicken broth, beef or vegetable will muddy the delightful brightness of the broccoli).

BROCCOLI: 1 LB, Break apart the sections and blanch for 2 1/2 minutes in boiling water.  Flash cool the broccoli in ice water and drain thoroughly (while you are blanching why don't you blanch 2 lbs instead and have the second lb stored in two sandwich bags in the refrigerator to serve as a side for another couple of meals)  Do not over blanch, remember the broccoli will be added back to the hot broth.  You don't want the off flavors the Cole family develops when over-cooked.

When drained, cut the stalks off the florets, placing them in another bowl.  Save the florets for later.  

ONION: 1 MEDIUM, Peel and dice into 1/4 inch dice. Saute' in  2 teaspoons butter (or non flavored oil).  cook until translucent (You don't want any color to develop)

After the onions are sauteed cover with 1 cup of "broth" or water.  Bring to a simmer. 

POTATOES:  4 MEDIUM,  peel and dice in 1/4 inch dice.  Add to the simmering onions.  Cook covered until soft. 

FLOUR: 3 TABLESPOONS,  place in a large cup and use a fork, whisk in slowly, 1 cup of cold broth (if the broth is hot it will lump the flour).  When thoroughly incorporated use your fork to whisk it into the simmering potato mixture.  Have your last two cups of broth handy, on the side, to start stirring into the mixture.  You can turn up the fire a little, you must stir constantly (I use a silicone spoonula at this point).  When you have the broth stirred in cook until  the raw flour taste is gone and the mixture is thickened.

At this point if you have an immersion blender, turn off the heat and retrieve the blender from where you stored it.  The broccoli stalks need to be stirred into your potato mixture. If you don't have an immersion blender a regular blender works and I imagine a food processor would too ( don't have one so can't tell you if it will).  Take the resulting mixture and return it to the pan (BTW if you want a greener looking soup ad a cup of frozen peas to the mix before you blend.)

Reheat your soup..If it is too thick for you, add some more broth. Correct your seasoning..you can add salt and pepper at this point.  An herb I love to use in broccoli soup is fresh lemon thyme.  When your soup is simmering again add back your broccoli florets, stir carefully so you don't wreck them.

This great diet soup(remember portion control) has another plus.  It is very quick to cook.  This is a soup which is designed to serve four.  You will have 1/4 lb of broccoli, 1 potato, 1/4 of an onion, 1/4 teaspoon butter, and 3/4 tablespoon of flour for each serving.  This is like having two sides on your plate.  Serving it with a large salad (no creamy dressing) will be a full meal with the addition of a protein (which could be a boiled egg).  

Enjoy.

Additions and ways to change this soup.  
Asparagus, 1 lb, peel the stalks and blanch 3 minutes and cold water shock.  Then cut stalks into 1 inch pieces (save 3 inches of the tops for adding at the end). 

Carrots, 1 lb (peel, slice in discs blanch 5 minutes) use 2/3 in soup and 1/3 to add at finish) Garlic sauteed with the onions add a whole new dimension. Using beef broth instead, changes it again.

May your garden be filled 
with the results of your energies expended.  

May your daily diet be delightful.

 For more blogs by me, visit at:

A blog mostly about quilting, but cooking, poetry, prose and a little gardening,
New blog, tutorial on how to make 5 panel Boxer Shorts.
New Blog about dolls.
Not a garden blog.  There are articles which have nothing to do with creating or gardening. 
There are blogs on the new born baby kittens we found and mothered.  
It is a blog where I voice my opinions which will always be environmentally friendly.
As always, any pictures or writings are my own. 
Credit has been given to contributions not my own.
Please do not use without permission.

Monday, June 11, 2012

BLOWN OFF COURSE

We are bird watchers and bird feeders.  We even have house birds: Two African gray parrots.   Our house is perched in the woods on the side of a hill.  We have lots of large windows so we can see down the valley.  The birds occasionally fly into the windows. 
 
Our Home is located in the south western corner of St. Louis area.
 
This morning when I looked out I found a bird dead on the deck.  I went to retrieve it.  I didn't recognize the bird.  I knew it was in the warbler family but it was not like any warbler I had ever seen.
 
I looked in our field guides for it and it was not there.  The distinctive stripes led me nowhere.  Google to the rescue.  I googled warbler three stripes on head.  Instantly I had verification what bird I had.  I had a "Three Striped Warbler."  The catch was, this bird is only in Costa Rica and Ecuador.  There was no chance I had mis identified the bird.  It was the only warbler with the stripes.  You can see by the match book how small it is. 

The following pictures are other views of him. 


The following information is from google.
 
This is a live picture of the bird    http://photography-on-the.net/forum/showthread.php?t=1082911
 
live picture and article about the three stripe
 
Found this in wikipedia:
The Three-striped Warbler (Basileuterus tristriatus) is a species of bird in the Parulidae family.
It is found in Bolivia, Colombia, Costa Rica, Ecuador, Panama, Peru, and Venezuela. Its natural habitats are subtropical or tropical moist montane forests and heavily degraded former forest.

Another article about this bird.   It coincidently is through the Missouri University

I can't imagine how the little thing made it all the way here and was so disappointed he had crashed into our window.  With the changes in weather and wind currents keep looking to the skies. This is the second bird we have had that didn't belong in the area. 

This is the link to the blog about our other "Blown Off Course" visitor. 
http://organicinstlouis.blogspot.com/2011/05/bird-feeder-visitor.html
 For more blogs by me visit at:

A blog mostly about quilting, but cooking, poetry, prose and a little gardening,
New blog, tutorial on how to make 5 panel Boxer Shorts.
New Blog about dolls.
Not a garden blog.  There are articles which have nothing to do with creating or gardening. 
There are blogs on the new born baby kittens we found and mothered.  It is a blog where I voice my opinions which will always be environmentally friendly.
As always, any pictures or writings are my own. 
Credit has been given to contributions not my own.
Please do not use without permission.
  

Tuesday, May 1, 2012

EPAZOTE: Nature's Beano

We were very fortunate to have two Mexican workers help us for 5 years.  Not only did we learn a little Spanish but we were able to have some lessons in harvesting the wild surpluses around our house.  We were treated to Bar-B-queing fish encrusted in salt.  I can't even begin to describe this succulent fish.
We were introduced to eating corn on the cob with Mayo or cream cheese on it.  The boys would constantly save the purslane they pulled to take home with them.  I googled it and tried it.  The taste was fine.  I tried it chopped in a cream cheese spread and steamed with butter.


One of the most beneficial herbs they taught us about was Epazote.  We have found so much about the plant which contradicts what is said about the plant.  The following two sites have the history of the herb and how they use it.


We have found our epazote is milder than what people refute it to be.  Ours is very heavy on the citrus side.  The creosote smell to us is more akin to the oil of citronella smell on the mosquito candles. (Too much of the herb can impart that flavor when cooked with legumes.)  We cooked it with lentils and found it did prevent gas.  I had the same findings when I cooked chick peas. 

How much is needed in a batch of beans I don't know.  I do know I put 6 stems in a 1 pound batch of dried beans and was able to taste the herb.  It wasn't a bad taste but it was there.  I will probably cut the amount in half the next time.  Knowing it works for us as de-gasser, I went looking for methods to preserve it (I had tried drying it one year and didn't like the results.)  The same thing happened with freezing it.  Googling provided me with information I already knew.

I remembered I had blanched basil to make pesto.  The results were a fabulous pesto which stayed green, not turning black.  I am one to experiment in the kitchen.  I have plenty of epazote so I gave it a try and blanched some.  Voila..it worked.  I dried the excess moisture off and froze it.  Then I thawed it to see what I had.  The only loss I experienced was a little of the flavor, which I compensated for by putting more in the package.  I used it in northern beans I cooked for baked beans.  The anti-gas substance was still there along with a nice citrus flavor.

Blanch it by dropping it in boiling water, stir it around for one second and take it out, placing it in ice water.  Dry it by rolling it in a flour sack towel (a lint free cloth).  Then I divided it into serving sizes and placed each in a sandwich baggie, squeezing out the air before closing the bag.  Each bag was made flat so they could be stacked in the freezer.  After they froze I put them all in a labeled freezer bag.
As always, I suggest to you to, read everything you can about new foods especially wild ones.  Make sure they will be a good addition to your diet.  When collecting wild foods make sure you know positively what you are picking (poison ivy would not make good quiche but lambs quarters does).
 http://organicinstlouis.blogspot.com/2012/03/lambs-quarters-healthy-choice.html
Remember peanuts, which are a good food, can cause health problems.

The picture on the right is a young plant.  A little larger than this is when I pick them. 

 For more blogs by me visit at:

A blog mostly about quilting, but cooking, poetry, prose and a little gardening,
New blog, tutorial on how to make 5 panel Boxer Shorts.
 New Article on my blog: 
"A MYSTERY IN THE MAKING"
A mystery quilt designed with the novice in mind
First Clue to be presented October 16.
Not a garden blog.  There are articles which have nothing to do with creating or gardening. 
There are blogs on the new born baby kittens we found and mothered.  It is a blog where I voice my opinions which will always be environmentally friendly.
As always, any pictures or writings are my own. 
Credit has been given to contributions not my own.
Please do not use without permission.

Wednesday, April 25, 2012

STRAWBERRY FIELDS

We won't have Strawberry fields.  We have tried that method of cultivation.  It didn't work for us.  Even raising the level of a row in a hump didn't help.  The beds were always to wet.  We have a built in water retention "pond".  Just an inch or two under our soil is solid yellow clay.  We are on a hill but that doesn't help because we have underground water which surfaces where ever it wants, especially when it is raining.  Then there is the opposite problem when a dry spell hits the area dries up and looks like salt lake with in twenty four hours of sun and wind.  I get cracks so big you can stick your thumb in them.

In 2008 we started a strawberry bed.  This wasn't our first try but it was the one we changed planting strategies on.  Previously we had tried the strawberry field row method.  Twice it was a failure.  We considered that we were the inept planters.   The picture on the left is a young plant from the 2008 planting. 

The plants had arrived before we were ready for them and we had to put them into pots or we'd loose them (we had never potted them before this).  After potting we worked feverishly to make an area in the garden for them.  We had a terrace we needed to grade to keep the water from washing down it into the green house.   While working on the terrace I commented this was looking like a raised bed.  I wondered if we could amend it and plant the Strawberries on the ridge.  

That evening we went and re read everything we had on Strawberry culture.  We googled even more.  The next day armed with information both old and new we set out converting the terrace into a strawberry bed.  Hauling buckets of sand, chips, peat and more peat, and great dirt from an abandoned compost area.  For the next two months I tilled the area once a week regardless of whether it needed it or not.  We wanted the area totally weed free.  Weeds are the strawberry bed's worst nightmare (besides slugs).

The picture on the right is our first harvest in 2009.  That planting not only survived  two years it was still producing heavily for 5 years.  We diligently weeded and mulched the bed and it paid us back for our efforts.


Fast forward to 2010.  The bed is still producing and growing great.  The bed is only 10 x 3 feet.  We were picking a minimum of 6 quarts a day from it.  The left picture is about 6 feet of that bed when it  started blooming in 2010.  The picture on the right is the first 6 boxes we picked off the bed in 2010.
This is our dessert plate that night.  The next few weeks we were picking morning and night.  I was making strawberry shakes, strawberry pies, freezing berries, and making preserves. 
I can't tell you how much preserves I made because I was giving it away. 
I did put back 48 jars for ourselves.
I have mentioned in 2011 we didn't garden.  The rain never stopped and the heat kept getting hotter.  It wasn't a good scene for strawberries.  Each day we could see the bed dwindling.  All sorts of fuguses were showing up rotting a plant here and another one there.  Our terraced bed did not save them from being too wet.  They never were able to dry off.  We lost the whole bed, and any chance of starting a new bed from runners off the old plants.
We are now in the same desparate place as you are.  We need to make a new bed.  I have the plants, They are cozy in their pots.  The following blog is about these plants:
 For more blogs by me visit at:

A blog mostly about quilting, but cooking, poetry, prose and a little gardening,
New blog, tutorial on how to make 5 panel Boxer Shorts.
New Blog about dolls.
Not a garden blog.  There are articles which have nothing to do with creating or gardening. 
There are blogs on the new born baby kittens we found and mothered.  It is a blog where I voice my opinions which will always be environmentally friendly.
As always, any pictures or writings are my own. 
Credit has been given to contributions not my own.
Please do not use without permission.