Pages

Friday, February 19, 2010

SPRING PROGNOSTICATORS

I love lions in my yard,
I think they are just dandy,
Growing in nooks and crannies,
Even where it's sandy.

Their antics make me smile,
 Popping up where least expected,
They do aggravate that man of mine,
He roars, when the lawn he's neglected.

Fashioning with their blooms,
A necklace, when I was small,
Moments so pleasurable,
A memory I recall.

Years have passed, I am grown,
Every year I do remember,
The blossoms that delighted me,
From March to Novemeber.

My life is filled with sunshine,
Each spring when the lions return,
They are the prognosticators,
Of the warm weather I do yearn.

Saturday, February 6, 2010

BONES OF THE GARDEN


Our garden lies silent and serene,
Beds are barren, no longer green,
Hiding under the ice and snow,
Chickweed and henbit are rampant, I know.

The hay barn, very old and gray,
Looks somber in the light of day,
The snow covered mulch mound,
Like a beaver den on the ground. 


The scaffolding, normally covered in vines,
Looks so lonely at this time,
There will be no children hiding in there,
No happy sounds in the garden to hear.

Wind chimes sound hollow and cold,
Bringing images of gnomes of old,
Birds are quiet, no laughter in their voice,
This weather gives them no other choice.


My well of wishes is empty today,
I'll fill it with geraniums on a sunny spring day,
Smile to myself remembering this day,
"I'm glad winter's gone", I'll say.


The standing stone sits lonely and bare,
Normally covered with the plants growing there.
No birds visiting, perching on his top,
No Kittens crouched, ready to hop,

On unsuspecting little crawly things,
Which warm weather and sunshine bring,
Waiting for toads and lizards hiding there,
No kittens, in the sun, grooming with care.


The blackberries fenced to keep out the deer,
The snow covered ground keeps roots warm, never fear,
Last year, heavily burdened branches,
Invited the marauders, increasing their chances,

Of scoring a free meal,
With berries hanging in reach, to steal.

Our green house silently waits,
For us to open the garden gate,
Inviting everyone to see the plants within,
Bringing the owners a satisfied grin.


DIARY OF A DAY

Last night it snowed and we dodged a bullet.  We were on the southern edge of the massive storm system that is travelling across the midwest and heading to the east.  It will be dumping lot on the coast.  We had at least 3 inches of rain that was followed by a couple hours of slush...the stuff that fell looked just like a frozen slushy drink.  Then it was capped by 2 inchs of wet snow.  It would have made great snowmen except for the fact the sun came out very strong.  Our green house was 90 degrees by 10:30 AM.

These pictures were not here 2 hours later.


Today Hunny did me a favor.  He took all the pea and bean seed and prepared them for proofing.  to proof seeds you take a piece of paper towel moisten it and take 10 seeds out of the packet.  you fold them up in the toweling and place in a plastic bag and lable the bag so you know which is what.  Then you put them in a propagation chamber.

After three days we will open each package and check to see if any sprouting has started.  Then we will check every day.  Recording what we find.  The seeds will be given two weeks to grow.  The percentage of viability will be how many of the 10 seeds sprout in the 14 days.  We will record on each package the percentage, it will tell me how close together I will need to plant the seeds based on how viable they are.

Today we also washed up planting boxes.  I am using the plastic trays that you get when you buy chocolate covered graham crackers.  They will be filled tomorrow with planting medium and planted with lettuce.  each tray will be labled and covered with plastic wrap.  It will then be place under the dome of a sheet cake tray  (the large rectangle cake tray).  Then we will set it in a sunny window till they start to sprout.  When they sprout the plastic wrap comes off and they live under the dome, until transplanting at about 2 weeks

The following I took from another blog I posted at the beginning of the year. It was part of a seed starting blog.

Our propagation chamber is nothing fancy and it serves a variety of purposes. To build your own you will need the following:
Styrofoam ice chest
Heating Pad or an old working yogurt maker
Easy to read Thermometer
Piece of card board
serrated knife
something like the bottoms of egg cartons or something of that height.

CONSTRUCTION: We have found the same heat source works in a large cooler (ours is 28"x 16" x 17") but we also have those that are 12x12x18. In the bottom corner of the cooler make a hole just large enough for the plug of your heat source to slide through. If you have chosen your old yogurt maker you will only need the bottom half not the lid. Place it in the center of your cooler on the bottom. Now cut the card board (the serrated knife is good for this) to fit on top of the yogurt maker.(it should just barely slip into the cooler and rest on top of the maker.) You want the card board to be a shelf above your heat source. 

Now remove the card board and make a series of one inch holes in the cardboard. make them far enough apart that they will support the weight of the trays you will be sitting on top of it. If you have chosen a heating pad you will need something to support the cardboard about 2 inches above the pad. (I have used egg cartons without their tops for this.). Your chamber is finished.

Put your thermometer in side and turn on your heating source and find out what temp your propagation chamber keeps. We found sometimes we have to crack the lid. Now you need to scrounge for take-out plastic containers with clear raised tops. The 2 inch deep ones are great, allows for starting medium and a little sprouting room (sometimes they sprout in the middle of the night..lol) rectangle ones are preferable to round ones...you can put more in your cooler.  You can also use containers that don't have lids by covering them with plastic wrap.  BTW...you can stack them inside the cooler...but remember everyday twice a day to reverse who is on top and whose on the bottom so they get the same amount of heat. Keep your thermometer inside and check it first thing in the morning to make sure your cooler isn't accumulating too much heat. I didn't say this was a low maintenance project. (If you are adept I imagine you could fix this with a thermostat to turn off and on the heat and keep it at the perfect temp.

We have had 20 years of success with our homemade box, I hope this works as well for you.

Monday, January 25, 2010

GARLIC: ENOUGH TO KEEP THE VAMPIRES AWAY

This is another recipe to take away the winter blues while you peruse the seed catalogues.  Garlic is also something alot of people raise (Not us, the last few years, it has been too wet; even in raised beds we have had it rot.  Hopefully this fall we can put some in and have it survive.).  Till then I have to purchase mine. 


I haven't found many things I eat that don't improve with the addition of garlic. 
Think about it;  mashed potatoes with garlic, fresh garlic minced and saute'd with
Broccoli, green beans with bacon and minced garlic, and the list goes on. 
One day looking through my stacks of cookbooks I came across this recipe for a peasants soup. 
It had a goodly amount of garlic (3/4 cup) and a small amount of other veggies. 
I fixed it and was impressed but all the time I am thinking what can I do to make this my own. 

Garlic soup is like Chicken broth, it is satisfying when you feel bad.  It is also satisfying if you are on a diet and have the urge for something filling and slimming.  It freezes excellently.  In my experimenting with the original recipe I have found a myriad of ways to make it.  This is also an extremely cheap soup to make.  Except for the garlic (which can be bought cheaper at the stores like Sam's and Cosco's), the rest of the ingredients are items we have in our pantries at all times.

GARLIC SOUP

INGREDIENTS:

2 LBS Potatoes, peeled and quartered or eighth'd (if large). any variety will do. 
(Original recipe called for 1 1/2 lbs.)

4 Carrots (I use large carrots), washed not peeled, cut into 2 inch lengths. Ends trimmed off.
(Original recipe called for 2) 

1 cup garlic cloves (approximately 3 heads). Peel by smashing with a knife. 
Leave the cloves whole do not mince or chop. (Original recipe called for 3/4 cup)

2 TBLS "fat", Oil (do not use olive oil), or butter, 
I have never used bacon drippings but I bet it would be great.

2 quarts "Liquid", water, chicken stock, beef stock, vegetable stock

EQUIPEMENT NEEDED

Soup pot with lid (at least 4 quarts)

Wide blade butcher knife for smashing garlic

Paring knfe for cutting the ends off the garlic and carrots,
and cutting potatoes and carrots in chunks

Vegetable peeler for peeling potatoes

Blender, processer, or sieve(foley mill), an immersion blender

Holey ladle

1.  The first thing you do is work on the garlic.  Peel it and get it ready.  Melt your butter in a soup pot (no smaller than 4 quarts).  Saute' the garlic till golden, do not make it dark you will ruin the flavor of the soup.  BTW DO NOT ADD ANY SALT .

2.  When the garlic is golden pour in the two quarts of liquid.  Each different stock changes the flavor of the finished product but all are good, even plain water.

3.  While the liquid and garlic are coming to a boil prepare your vegetables adding them to the pot of liquid.  Bring all to a boil and turn down to a simmer.  Cover and slow simmer for one hour. 

4.  At this point you can wait another hour and let it cool on the back of the stove (when it cools down it is easier to process). 

5.  Use what ever means you have for puree'ing the pot of soup.  When you have the entire pot pureed if you want return the contents to the pot and reheat to serving temperature adding salt to taste.  The original called for adding a cup of cream at this point.  To me it is an unnesessary step and doesn't add to the flavor of the soup. 

At this point I divide mine into containers the size we use.  I do not salt till serving.  This soup served with herb bread 

http://gloriouscreations.blogspot.com/search/label/COOKING%3A%20BREAD%20BAKING 

and a salad is the perfect lunch.  Serve it in a mug and it is the perfect snack in the afternoon.  When it is made with chicken broth you get the doupble whammy of the garlic and the chicken soup to keep away the cold and flu.  With the addition of the extra carrots you are getting extra vitamin "A". 

This soup looks and feels like cream soups.  And is much easier to make.

HINT: DONOT MAKE THIS AT NIGHT WHEN
PEOPLE ARE TRYING TO SLEEP

(It wakes up taste buds.  I am salivating just thinking about the smell. 
I made this at my mother's one night when I couldn't sleep. 
The next morning she said the smell kept her awake all night, making her hungry.)

Friday, January 22, 2010

CUCUMBERS: WHEN THEY AREN'T COOL

I didn't know whether to include this article in this blog or my other blog, http://www.gloriouscreations.blogspot.com/ . 
I post recipes on both blogs.  The final decission
came down to our need for thoughts of spring and perusing the garden catalogs. 

It is cold and dreary with off and on rains in the St. Louis area.  Even my house feels damp.  Today I am organizing seeds, seeing which ones I want to use and making sure I have enough of those.  My mind is also thinking what to have for supper.  I am for sure going to have soup.  I'll break my arm patting myself on the back right now, I make really good soups.  Just ask me..lol.


 I ran to the fridge to see what was there that needed to be used up.  When I make un-planned soups I usually make them from what ever veggies are on their way to crossing over.  There on the shelf were two of those long hot house cucumbers.  They had gotten their ends froze from being on the wrong shelf.


Just recently I heard about cucumber bisque.  This is a soup served cold. I didn't think I was in the mood for a cold soup on a day like today.  I have cooked with cucumbers before, the resulting dish was excellent.  I decided to make a hot cucumber soup for tonight.


I cleaned the cukes, throwing the bad parts in the compost bucket.  Reached in the veggie bin, there was a bunch of celery that would be over the hill in the next week.  On the shelf was a plastic container that had accumulated the halves of onions I didn't need in other dishes.  A peek in the freezer revealed a bag of frozen peas that had about 10 ounces left in it.


I proceeded to assemble my soup.  I can't wait till supper to serve it.  My taste sample made me want to eat all I had prepared.

INGREDIENTS 

BASIC SOUP:
1 cup 1/4" diced celery
1 cup 1/4" diced onion (don't use red onion)
1 cup 1/4" cucumber (no seeds if you use regular cucumbers, do not peel)
Kosher salt
2 TBLS butter (you can use an oil with no flavor if you like)
1 can Swanson's chicken broth (Or home made with salt)
10 oz Frozen peas

BEFORE SERVING:
1 TBLS Butter
1/2 cup fine diced celery
1/2 hot house cucumber cut in 3/8" dice (do not peel)
Lemon Thyme (dried, rubbed, afterall it's winter right now)
Salt to taste

EQUIPEMENT
Heavy stainless pan (I used a 5 qt dutch oven)
heat proof rubber spatula
knives to slice and dice
blender

BASIC SOUP:

1.  In 2 TBLS Butter saute'  diced onions, celery, and cucumber (sprinkle with about 1/4 teas salt)  in your stainless pan till the oinion is soft and translucent.  Do not brown.

2.  Pour your can of broth in the pan and turn up the heat and simmer covered for about 3 minutes.  Turn off the heat and leave it for about 3 minutes. 

3.  Pour into your hot broth the package of frozen peas.  Stir until the peas are defrosted. (do not apply more heat or cook in any way)

4.  Have your blender ready and put the contents of your stainless steel pan in the blender bowl.  (You can use a food processor too)  If your blender is not large enough do it, blend in small batches.  You want the contents thoroughly pureed. 

BEFORE SERVING:

Preheat your creamed soup bowls in a 200 degree oven (Or microwave them filled with hot water till the bowl is hot)

1.  Use your cleaned stainless steel pan, Saute' the fine diced celery till aldente', add the diced cucumber and and saute' till tender.  (you can cover the pan and finish them.) 

2.  When the veggies are saute'd add the pureed soup (being mine was stored in the fridge all afternoon I brought the soup back up to serving temp in the microwave.  I didn't want to sorch it in the pan or cook away the fresh taste.)  Add salt and lemon thyme to your taste.  I didn't add the lemon thyme I was in a hurry and forgot. 

The soup was very thick.  I could have added at least another 8 ounces of broth.  BTW...If you want vegitarian I would say add plain water and some salt.  I wouldn't add Veggie broth because it would add too many other vegetable flavors and muddy the flavor of the soup. 

With the addition of the other 8 ounces of broth; this amount of soup could serve 4 easily.

The flavor of the soup was outstanding.  Very spring and green tasting. I imagine the soup could be made with green zucchini too.  It was thick and satisfied my taste buds making them think they had indulged in cream soup.  In my other blog is a recipe for herb bread that would compliment this soup.  If you want to make it decadent, add a dollup of sour cream.

While eating the soup I thought a nice addition  to the basic soup would be a cooked potato blended in and a diced cooked potato added before serving. Crisp bacon bits might be good too.

If you try this quickie soup I hope it is as enjoyable for you as it was for us.  I will be posting my garlic soup recipe later this week. It's a fast to make soup too. It goes great with the herb bread.  In fact all the soups seam to be attracted to Herb, LOL.


Monday, January 11, 2010

COOKING WITH A SWEET HARVEST

If you enjoy sweets and have never grown them, please indulge enough room in a corner of your garden.  Enough room so they can sprawl where they want.  Have a great pile of friable dirt that is mostly compost.  The deeper your pile the better your sweets and the larger and more perfect your sweets.  This year proved water is a sweet potatoes best friend,  but I imagine if we had not had them in a raised bed it would have been detrimental to their health, probably causing root rot and lots of other funguses and things I can't even imagine. Well drained and consistent moisture is the key.  When sweets are first planted we make sure they have adequate mulch but they don't need it replenished as they grow because they grow a mat of leaves that does a surpurlative job. (unless you have critters that lunch on the plants. lol)
This is our four sweet potato plants when they were about 3 weeks in the ground.  They had no idea they were to be ravaged three times in their lives.  Twice by the ground hogs and once by our deer population. They are in a raised bed that is approximately 20 inches deep filled with compost. the other plants in the bed are ancho chillies which did fantastic paired with them.  We only had to keep the vines from growing up into the cages.  Everyday, as I perused the garden, I made sure to stop and re-arrange the vines, extracting them from their new found home. 


We only raised four plants because we did not have an area ready for them.  This year we raised our own plants from the sweet potatoes we saved from last year.  Last years potatoes were from a potato we bought at the store that was exactly the consitency, color and flavor we loved.  We have no idea the variety.  The sign at the store was just a generic "Sweet potatoes 89 cents pound" (Catalogs can't provide taste test.)  Raising the starts was very easy and a lot of fun. 


This is the recouperated potatoes after they had been eaten to the ground by a family of groundhogs. Notice how big the pepper plants are.  A couple of months have gone by.  The cage contains my lone eggplant (hunny doesn't like eggplant).  We put it in a screen cage to hopefully deter the flea beetle.  We are organic and  always looking for a natural pest preventative.  BTW..aluminum screen does not keep the flea beetles away.  The base of the screens goes into the dirt to keep bugs from going under.


This is some of the  harvest from only one of the plants, there were other tubers  on this plant too.  They were similar to the tuber in the back of the picture.  The coin is a dime.  Those four plants had over 10 lbs apiece under the ground.  The largest potato is 16" long X 11" radius, approximately 3 1/2" in diameter.  It weighs 2 lbs 12 ounces now.  It lost 4 oz in storage.   We have saved out two tubers from this harvest for growing our starts. 

Last night we had a hunger for sweet potatoes.  I thought what can I do to make them different and fun.  There is the normal candied sweet potatoes, and of course a fabulous baked potatoes, but I had the urge for something different. 

Being there is just the two of us I pulled out a corning ware 1 3/4 quart covered casserole.  Retrieved 4 tubers that were about 8 oz each.  I have had a lot of trouble with sweets turning black immediately after they are peeled.  I decided lemon juice works for other things maybe it will work for the sweets. I put about 1/4 cup of jarred lemon juice in a bowl (no fresh lemons on hand, but I can't think this would make a difference in the final product).  I proceeded to slice the tubers in 3/8 inch slices, peeling the slice as I went.  Tossed the slices in the lemon juice.  When all the slices were prepared I decided to leave the juice in the bowl with them.  Next I tossed them with 1 1/2 TBLS of flour.  Anytime I have made the candied sweets the syrup on them just doesn't stick the way I like.  So I figured this might work.  Next I tossed the potatoes with 3/4 cup, loosely filled not packed, light brown sugar.  Sitting on the table was a bowl of apricots I had reconstituted for breakfast.  I thought, I wonder, and added 16 apricots to the potatoes.  With  a final tossing I put the mixture in the corningware dish and topped the sweets with a 1/2 stick of butter cut in pats and scattered over the surface.  Put on the lid and baked in the oven till the potatoes were done and the syrup thickened.  The flour worked perfect.  The syrup was very perfectly thickened and the lemon added the right zing.  The apricots complemented the sweets well.BTW, the lemon juice kept the black away .

I rate this dish as one of the more delicious ones that have popped into my mind.  Outside it was -16 in my valley yesterday (January 10, 2010) and it was very satisfying knowing I didn't have to run to the store to buy the potatoes. (St. Louis at the airport had a -6)


Tuesday, January 5, 2010

DON'T BELIEVE THOSE SEED PACKETS

BUILDING A PROPAGATION CHAMBER

This is the beginning of the New Year. A fantastic year it is to be. After all the date is 2010. Doesn't it even have an exciting sound. It is the beginning of a new decade. Our New year's eve practice is to sit and peruse the seed catalogues. We need bibs because of the drooling we do. Especially the plants that we know we can't possibly grow due to climatic conditions. We have started our own seeds for years.

Starting seeds is not Rocket Science. There is tons of info available on the Internet or in books or on the back of the seed packets. Beware of taking for gospel the info from any one source, read everything, and talk to everyone, then make a decision on what might work for you.

The reason I say, don't trust the seed packets, is because I have never had the info on the back of them turn out to be right for me. For instance, on the lettuce packet it says 7-10 days germination. We always have fresh seed germinate in less than three days in a controlled propagation chamber. Maybe if it was outdoors it might take that long. We always start ours indoors because our weather is so inconsistent we would not have a good germination rate (usually it is too wet to cultivate at the time we need to plant lettuce).

We have been told 80% percent germination is good. Planting indoors we have had what seems to be 100% germination. The other thing to not trust is the guidelines for the growth habits of your plants. Good organic soil seems to add inches to the projected size. Also don't be afraid to transplant a seedling which seems to be falling behind to a different location. It is said, "location, location, location." We have found that so true.

This week we will spend the snowy Thursday deciding what we need to buy and what seeds will still be worth saving if they will germinate for us. My Hunny will test all our peas and beans. He will put them in wet paper towels and into our propagation chamber.

Our propagation chamber is nothing fancy and it serves a variety of purposes (I have used it to make yogurt).

To build your own you will need the following. Styrofoam ice chest Heating Pad or an old working yogurt maker, Easy to read Thermometer,  Piece of card board, serrated knife something like the bottoms of egg cartons or something of that height.

CONSTRUCTION: We have found the same heat source works in a large cooler (ours is 28"x 16" x 17") but we also have those that are 12x12x18. In the bottom corner of the cooler make a hole just large enough for the plug of your heat source to slide through. If you have chosen your old yogurt maker you will only need the bottom half not the lid. Place it in the center of your cooler on the bottom. Now cut the card board (the serrated knife is good for this) to fit on top of the yogurt maker.(it should just barely slip into the cooler and rest on top of the maker.) Now remove the card board and make a series of one inch holes in the cardboard. make them far enough apart that they will support the weight of the trays you will be sitting on top of it. If you have chosen a heating pad you will need something to support the cardboard about 2 inches above the pad. (I have used egg cartons without their tops for this. I have also used cardboard strips).

Your chamber is finished. Now put your thermometer in side and turn on your heating source and find out what temp your propagation chamber keeps. We found sometimes we have to crack the lid. Now you need to scrounge for take-out plastic containers with clear raised tops. The 2 inch deep ones are great, allows for starting medium and a little sprouting room (sometimes they sprout in the middle of the night.) Rectangle ones are preferable to round ones...you can put more in your cooler. BTW...you can stack them inside the cooler...but remember everyday twice a day to reverse who is on top and who's on the bottom, so they get the same amount of heat.  Keep your thermometer inside and check it first thing in the morning to make sure your cooler isn't accumulating too much heat. I didn't say this was a low maintenance project. (If you are adept I imagine you could fix this with a thermostat to turn off and on the heat and keep it at the perfect temp.

We have had 20 years of success with our homemade box, hope this works as well for you.

Tuesday, June 9, 2009

CHIVES MAKE A STATEMENT

Chives, a member of the onion family, are continuous givers of pleasure and food. They are a delight to the palette as well as to the eye. I continually try to influence the visitors to my garden to try a lot not just a few groups.
Chives take almost no care. They crowd out weeds. The tight knit clumps discourage infiltration. I say discourage because a grass seed or other weed seed can sneak in. As you are taking a walk-about in your garden you need to be vigilant, pull them when they are tiny before they establish a root mass which becomes inextricably entangled in the chive's roots. Chives are not very picky about their soil conditions. I have planted them in everything from pure clay to Florida's sandy soil (?).
The ones you see here are planted in composted manure. It is several kinds of mixed manures with their bedding. I didn't know if it would work. The area is a waste land area along side the curve in the road. Even though our drive forms the triangle shaped area , and it runs across the front of our property, it belongs to the county. They never take care of it and it was overgrown with weeds and lots of poison ivy.
Many years ago we tried unsuccessfully to improve the area. We became tired of replanting and grubbing out the weeds. We had to continually replant because people would stop and dig up our plants. The gate cannot be seen from the house or garden. In the past two years a subdivision has been built on the farm land across from us. We figured we'd try again. thinking we'd have better luck with the increase of traffic stopping the thefts.
This is the view after we cleaned the area and applied an eight inch layer of the manure compost. I had not given any thought as to what would be appropriate to plant there. The manure is still very hot. It is only composted for two weeks. We figured if nothing would grow, then the weeds wouldn't either. So problem solved, we wouldn't need to plant or mow or weed eat.
This was in April when the rains were coming almost everyday. I was hoping the "mulch" would be leached of its excess nitrogen and be a safe environment for plants. The night after spreading the "mulch" we had a thunder-buster of a rain. It took the fluff out of the bed making it about 4 inches high. It rained off and on for the next two weeks. We had time to plan what to plant. Our choice was made easy and fast. We have been doing lots of renovating in the garden adding new raised beds (new in the sense that they are in a new location. Most of our beds are made of recycled lumber.) I needed to move a nursery row of lambs ears and a long row of chives that were where the new beds needed to be. I couldn't throw such nice plants in the compost pile!
"Light bulb", If you are considering digging them up and composting them, why not give them a chance down at the gate in the manure. thinking that if they didn't grow I wouldn't be out anything because I was going to throw them away. They didn't just grow, they thrived. By this picture you can tell these were not small plants. The only problem we noted from the first was the stuff was to dry and porous. the water went right through. for almost a month I was carrying water to the gate in my "little red rooster" (that is what I call our motorized golf cart type "truck" that cannot be used on roadways.)
This is the area in June. As you can see things seem to be thriving. I have extended the area with more compost to the other side of the fence. The only thing I have planted there is more lambs ear. The shade is too dense. The lambs ear doesn't seem to mind. I have been trying hostas. The deer are leaving them alone (too much traffic).
The only problem we are having is the porousness of the medium. As it breaks down and the roots dig in deeper we should have to water less.
I have since planted mums and geraniums. They seem to be adjusting well. They receive only 1/3 of a day sun in the morning. I also planted 2 lilac bushes. The one is 3/4 day sun, in gravely soil under the compost. It was doing poorly but it has since come up from the roots and looks wonderful. I hope it puts on a growth spurt with the fall rains. The other one only gets about 1/2 day sun and it doesn't seem to be growing. It is in better dirt, but the tree is probably sapping some of its nutrients, and probably the water.
Back to the chives. They were just trimmed back for the second time. They had that late summer droop, and the long hot summer had dimmed their normal bright green color. The cooler weather in September should perk them right up.
Please consider useing chives for more than a gastronomic delight.

Wednesday, March 25, 2009

SPRING CLEANING

This was last fall preparing the beds for winter.
I would like to say I am cleaning in the house but alas garden time is here and the house will be here when cold winter is here and the garden won't. I am cleaning in the garden.
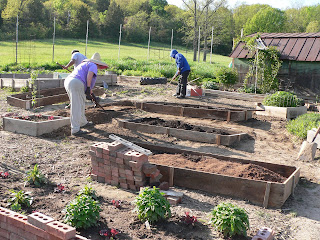
Actually we did a humongous job of cleaning last fall, which has turned out to be a major advantage so far. We have been building raised beds due to our clay composition soil that seems to eat good dirt for lunch. We clean all garden debris off the beds and proceeded to add amendments that would be needed this year.
The amendments we use are peat moss, dried manure (we still have a nice pile of sheep manure in an old shed), and broken down wood chips (sometimes we also use the leaves we vacuum up with the mower.) We mix them into the dirt with our small tiller.
We own a Mantis. We recommend a Mantis. This is our second one. The first one we bought from an auction. It went bad after a couple of years and we found out mantis had a trade in program for old machines. We traded ours in and got a "new" reconditioned one from the company. I know we have used this machine for at least 5 years. It is a real work horse. It is so light weight even I can handle it. My only problem, I've never been able to pull start any gasoline engine. So if I want to use it I have to plan for someone to be around, or plan to use it in the morning and have my Hunny start it as he leaves to go to work. the only thing I find it does not to an admirable job on is unbroken soil. If it is packed dirt it just bounces around on top.
This was another reason we started making raised beds. The soil stays so nice, requiring less tractor work. We have tried raised beds where the dirt is mounded up. They work the same but the dirt has a tendency to to drift away by the end of the year. Mulching didn't seem to make a difference.

Back to the Fall preparation of the beds. Last fall I mowed the pasture next to the garden with the riding mower. The next day after the grass dried I vacumned it up and made a huge hay stack on the side of the garden. After we amended the beds and raked them smooth we covered each bed with a comforter of the dried grass. the grass was mounded as much as the bed would hold with out sliding off. That usually was about 8 inches thick.

Hunny worried we would be harboring insects from 2008. I stated my case that I thought being we removed all the debris that the problem went into the compost pile. (all noxious weeds and squash waste were cardboard boxed and thrown into the trash didn't want to multiply either).

Spring delight: I removed the grass pile from the first bed. The dirt under the cover was light and fluffy, just about the same consistency I left it in November. The grass had prevented the heavy rains and snow melt from soaking the soil (the grass wasn't even soaked.) I put the hoe into the soil and was able to make a trough down the middle of the bed and plant my spring onion sets. There was no spring weeds (the henbit and chickweed run rampant on any open ground durning the winter). The grass that was removed from the beds will be composted.
I will update this with a picture of the undressed bed. So far it is a labor we will repeat at the end of this year. The bed was warm and ready for planting. Will keep you posted on the progress or the "distress" caused by the winter coverings.
Happy gardening, Sheepish

Thursday, March 19, 2009

COOKING FROM YOUR GARDEN


Cooking from your garden can be a year round occasion. (even if you live in a climate with freezes.) I am very fortunate to have a green house with a smaller green house we keep heated in the cold winter. (We found it never needed heat after the sun was up.) We still haven't found a way to heat it efficiently during the night hours.) Inside the small green house I put sage and rosemary this year. It survived quite admirably. Anytime I have tried to grow them indoors they do not respond well, they die before a couple of months go by. 

I also planted chives inside the large green house. I thought they would make it all winter...NOT...but they did start growing again a whole month in advance of the out door ones.. It is definitely something I will do next year. I will also try my tarragon in the green house next fall. Yes, it will probably die back but it will probably be up sooner. (the tarragon is coming up outside right now.)

I have been using the fresh sage in the green house to make the following bread. Today I made a grilled cheese with the bread and in between the slices of cheese I spread sage pesto. Yes it was made from the sage in the green house. It was very yummy.

One change I made in the recipe below, this time I bake it in a loaf pan that was 13 X 4 1/2 X 2 1/2. I put it into a 400 degree oven and turned it down to 375 immediately. I baked it for 30 minutes. The crust was so tender and the graining in the bread so fine and moist.
This recipe comes from a cookbook published in 1974 by the Culinary Arts Institute (Chicago). It is "The American Family Cookbook".  This is a yeast bread that adds to its appeal by being super easy to make.

"Old Fashioned Herb Bread"
One package dry yeast (I have the bulk bakers dry instant yeast and I use 1 1/2 Tablespoons) If you bake a lot or a little the yeast comes in 1 lb. vacuumed packed packages from Sam's Club (Costco and other places probably have it too.) When you open the package pour it into a canning jar and screw a lid on it and place in the door of the refrigerator. I have had a package last more than a year. It is a big savings over the individual packets or the jar sold at the grocery store.

1.  1/4 cup warm water + 1 teaspoon sugar stirred in(the original recipe doesn't add the sugar but I have found the yeast is more responsive when you do). Sprinkle the yeast on the warm water and stir in. Set aside to proof. For those who are new to yeast baking, proofing gives the yeast a chance to grow and bubble up before you add it to your recipe. BTW, if it doesn't bubble up, you have yeast that is no longer alive. Pour out the mix and start over with a new packet. (It takes about 10 minutes for the yeast to grow and double if it is set in a warm location.)

2.  While the yeast is proofing do the following:
3/4 cup whole milk heated very hot in the microwave. (the recipe says scald, but in this day and age of pasteurized milk it is unnecessary)

3. Place 3 tablespoons butter in the mixing bowl, with 3 tablespoons sugar and 1 1/2 teaspoons salt (if you use salted butter only add 1 1/4 teaspoons salt). For new bakers, do not leave out the salt. Salt is necessary to control the growth of the yeast.
Pour the very hot milk over the above and mix until everything is dissolved and incorporated.

4. You will be using a total of 3 to 3 1/2 cups of flour. All purpose flour works but bread flour works even better. (Every since I started using bread flour I have had a more consistent finished product.) Stir 1 cup of flour into the milk mixture. Mix well.

5.  Beat 1 large egg in a cup. (the egg should be room temperature.)
Chop fresh sage very fine use 3 Tablespoons. (Dry sage from the store works well too, use 2 teaspoons ). You need 1/4 teaspoon ground nutmeg. Stir these ingredients into your beaten egg.

6.  If your milk mixture has cooled to about 115 degrees or very warm to the hands (Not hot you'll cook the egg), beat in the egg mixture into your milk mixture.

7. When well incorporated add your bubbling yeast. Mix well and start adding the last 2 cups of flour. You will have a very sticky dough (unless you live in a real arid part of the country where your flour is naturally drier right out of the bag.

8. Sprinkle the last 1/2 cup flour on your table or board. Brush the major amount over to the side leaving a heavy film on the table. Scrape your dough out of the bowl onto the flour. Start kneading the dough in the flour adding a coating on the ball if it is too sticky to work with. This is a very soft dough and you do not want to work it till it is a firm dough. If you add too much flour you will have a very dense loaf.

9. Place a tablespoon of oil in the bottom of a large bowl. Roll it around till the sides are coated. Put your dough ball in the bowl and then turn it over, you will have greased the ball to keep it from drying out. I cover my bowl with plastic wrap and set aside to double in bulk. (It seems to take longer to double than most yeast doughs.)

10. While your dough is rising you can do clean up duty and grease the pan you will bake it in. I have used a large ceramic baker (looks like a soufflé' dish) I grease it with Crisco and then sprinkle corn meal on the bottom. Yes I know what they say about saturated and trans fats. But I have tried Pam, olive oil and other forms of fats and have had very unsatisfactory results with the bread sticking.

I have used the 9 inch pie pan the recipe suggests. It makes a low round loaf. I prefer the higher loaf of the ceramic baker. It looks like a chef's hat when finished. I also have used loaf pans. Makes a great sandwich loaf but doesn't have the flair of the pie pan or the ceramic baker when served.

This last time I made the bread I used some glazed flower pots I have that were made for cooking. (only use flower pots you know do not have clay that contains lead.) I don't know if you could foil line some pots and make them safe to bake in or not. Anyway, the results were fantastic. It made 4 (4 inch) pots. Each resulting "roll" that easily serves two or you can if you are really hungry eat one by yourself.

11. When the dough has doubled, punch it down and let it rest in the bowl 10 minutes. Then take it out and give it a quick knead and shape into a round ball. Place in the middle of the container you will be baking it in and let it rise till double in bulk. When you see it is near completion of rising, preheat your oven to 400 F degrees.
At this time you can take a beaten egg white and brush the surface of the dough and sprinkle it with caraway seeds. (This is totally unnecessary but if you are serving to company is a nice touch.) If you are not using the seeds then it is unnecessary to brush the dough with egg white.

12. Place in the 400 degree oven for 10 minutes and then lower the heat to 350. (the recipe book says 375 but I have found this is too hot in my oven.) bake 25 minutes more. This loaf is very dark on the crust.

Note: the book says you can add 1 teaspoon of caraway seeds to the dough when you add the sage. I never have tried this. I imagine you could use other herbs instead of the sage but why this is so fantastic.
This bread served with homemade tomato  soup  
WOW...BTW...tomato soup home made is just about as easy as opening a can of the canned kind...and so much more satisfying.